overview

Zombies (Also and originally known as Nazi Zombies) is a survival-type game mode. First appearing in Call of Duty: World at War, it became highly popular upon the game's release, and returned in Call of Duty: Black Ops. In some maps the player faces zombies of other nationalities, including American zombies "Five", Imperial Japanese zombies Shi No Numa, Soviet zombies Ascension and Call of the Dead, and Asian zombies Shangri-La. Zombies content is generally only considered canon in its own universe (i.e. the Zombies do not exist in the World at War campaign but do within the Zombie maps).
Up to four players must survive endless waves of attacking Zombies, earning points from killing zombies and repairing defenses. These points may be used to purchase weapons and perks in the process, or to unlock new areas and activate other special objects. Zombies enter the player-accessible area of the map via strategic positions such as windows or holes in walls, which are initially barricaded but will be rapidly demolished by zombies. They can be repaired, however. There is no limit to the number of rounds; the game will end when all players have been incapacitated or killed by the zombies. Zombies become stronger and faster upon the completion of each round, forcing players to make tactical decisions about point spending and progressing through the map. On occasion, zombies will drop power-ups such as Max Ammo and Insta-Kill upon their death, making the round easier.
Altogether, Zombie Mode consists of ten maps; the first, second, fourth, fifth, and seventh feature Nazi zombies (Nacht der Untoten, Verruckt, Der Riese, Kino der Toten, Dead Ops Arcade) , while the third features Imperial Japanese zombies (Shi No Numa), the sixth features American civilian, military and scientist zombies ("Five"), the eighth features Russian scientist, cosmonaut and military zombies (Ascension), the ninth features Russian zombies, but this time they are sailors and divers (Call of the Dead), and the tenth map features Asian civilian zombies (Shangri-La).
Shi No Numa, Der Riese, Kino der Toten, Ascension, and Shangri-La all have the same four playable characters. They are also heard in Call of the Dead. They also appear in Nacht der Untoten and Verrückt in the Hardened and Prestige editions of Black Ops, while "Five" has characters who actually existed in real-life. Call of the Dead features real-life celebrities as the characters and one as an enemy.
The zombies game mode is also known for carrying on the tradition of odd easter eggs within Call of Duty games. These easter eggs used to be found primarily in the single player campaign but are now usually found within the Zombie maps.
point system
This system applies to Normal Zombies, Hellhounds, Crawler Zombies, Space Monkeys, the Pentagon Thief, and Monkeys when going to pick up drops.
- Non-lethal hit: 10 points.
- Lethal torso hit: 60 points.
- Lethal limb hit: 50 points.
- Lethal neck hit: 70 points.
- Lethal headshot: 100 points.
- Lethal melee: 130 points.
- Lethal grenade: 50 points.
- Non-lethal grenade: 10 points.
- Melee to a monkey before it hits the player or takes the drop: 500 points
maps:
kino der toten survival guide:
Good Doggie
Every five or so rounds you'll hear different music signaling the coming of hellhounds, which some might remember from "World at War." These pooches won't ever appear WITH zombies; they get their own round. Your best bet for taking on the dog is to pull out a shotgun, form a battle line (preferably behind a bunch of claymores, if you've purchased them) and go for headshots.
Dog rounds can be intense, but there's a bright, shining light at the end of the tunnel: the last pooch to die always drops a Max Ammo bonus. Make sure everyone reloads before you grab it, to better maximize the ammo gains.
Upgrade Your Weapons
Both maps feature a Pack-A-Punch machine, where 5000 points can be spent upgrading one of your weapons (you get an ammo refill for the weapon as well, FYI). Getting there in Kino Der Toten isn't too tough, it just takes some planning. Starting with the set of double doors on the second floor of the room you start in, work your way through a series of rooms (and doors) until you get to the theater.
Flipping the power switch -- located right near the purchasable M16 -- raises the curtain. Jump off the stage and head to the other end of the room, paying to unlock one last set of doors which open back into the starting room. With the power now on, flip the activator switch in that starting room and then head back to the theater stage, where the impossible-to-miss teleporter will now be active. Hop in and you're whisked away to the Pack-A-Punch machine, a completely zombie-free room overlooking the theater. You only have 30 seconds to spend there though, so do your business at the machine as quickly as you can.
Back Alley Bliss
The best place to hole up on Kino is a small alleyway located just a few rooms past the theater. Right near the power switch/M16 (claymores are on the wall opposite the M16, FYI) is another door. Open that and follow the series of rooms until you reach a set of stairs going down to an alleyway. There's a fence you can open here BUT DO NOT OPEN IT! As long as that fence is closed, you can only be attacked from two places: the stairs you came down to get here and a ground floor window off to the right of the stairs. Skillful players won't even bother with a crawler; from here, you can easily keep a single zombie at bay at the window, rebuilding a plank at a time as it tries to break through.
"Five" Survival Guide

Stick To Your Guns
First, the good news. There are no hellhound rounds on "Five" to worry about. Instead you've got a scientist zombie who can't even hurt you. What he does, however, is much, much worse. Appearing less frequently than the hellhounds, this guy will appear all by his lonesome. It's possible to kill him, but he soaks up a TON of damage (four players emptying all of their assault rifle rounds into a scientist MIGHT kill it, with enough headshots). Here's where it gets tricky: if this guy gets close to you, he STEALS whichever weapon you happen to have out at the time. NOT cool, especially after you've visited the Pack-A-Punch machine. Avoid him if you can, or keep your crappiest weapon out and hope for the best. Also good to know: the elevators stop working when the scientist comes out to play, so don't bother trying to escape to another floor.
Upgrade Your Weapons
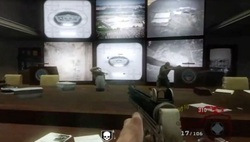
Much like Kino, a convoluted path must be taken in order to reach the Holy Grail that is the Pack-A-Punch machine. From the starting area, make your way into the hallway and take the elevator down to the War Room, noting the DEFCON switches scattered around the walls. Take the stairs down (paying to clear debris as you go) and make your way to the freight elevator. Take THAT down to the laboratories and locate the power switch, just like Kino. Once you've got the juice on, head back to the war room and hit any DEFCON switch you see with a green light next to it until you hit level 5. An alarm with sound at that point, a cue that ALL teleporters will now send you straight to the machine for a limited time.
Death In An Elevator
There's no single location in Five that is easily defended with a convenient choke point. What you DO have is an elevator, and the breathing room a ride up or down can provide as your reload and revive. Five features two elevators: the one connecting the starting area with the War Room and the larger freight elevator, which connects the War Room and the labs. The latter is the one you'll want to call home. You'll have two entry points to defend, since that elevators two sets of doors both open on each floor, one on a barrier and one on the floor itself. This is offset by the fact that you can buy the SPAS-12 shotgun in the War Room, found JUST outside the elevator. Easy, quick access to ammo and an up/down button you can press for a moment to breathe when the horde gets to be too much.
First, the good news. There are no hellhound rounds on "Five" to worry about. Instead you've got a scientist zombie who can't even hurt you. What he does, however, is much, much worse. Appearing less frequently than the hellhounds, this guy will appear all by his lonesome. It's possible to kill him, but he soaks up a TON of damage (four players emptying all of their assault rifle rounds into a scientist MIGHT kill it, with enough headshots). Here's where it gets tricky: if this guy gets close to you, he STEALS whichever weapon you happen to have out at the time. NOT cool, especially after you've visited the Pack-A-Punch machine. Avoid him if you can, or keep your crappiest weapon out and hope for the best. Also good to know: the elevators stop working when the scientist comes out to play, so don't bother trying to escape to another floor.
Upgrade Your Weapons
Much like Kino, a convoluted path must be taken in order to reach the Holy Grail that is the Pack-A-Punch machine. From the starting area, make your way into the hallway and take the elevator down to the War Room, noting the DEFCON switches scattered around the walls. Take the stairs down (paying to clear debris as you go) and make your way to the freight elevator. Take THAT down to the laboratories and locate the power switch, just like Kino. Once you've got the juice on, head back to the war room and hit any DEFCON switch you see with a green light next to it until you hit level 5. An alarm with sound at that point, a cue that ALL teleporters will now send you straight to the machine for a limited time.
Death In An Elevator
There's no single location in Five that is easily defended with a convenient choke point. What you DO have is an elevator, and the breathing room a ride up or down can provide as your reload and revive. Five features two elevators: the one connecting the starting area with the War Room and the larger freight elevator, which connects the War Room and the labs. The latter is the one you'll want to call home. You'll have two entry points to defend, since that elevators two sets of doors both open on each floor, one on a barrier and one on the floor itself. This is offset by the fact that you can buy the SPAS-12 shotgun in the War Room, found JUST outside the elevator. Easy, quick access to ammo and an up/down button you can press for a moment to breathe when the horde gets to be too much.
ascension survival guide
Mind the Monkeys
Okay, here's how the Space Monkeys work. Once the power has been turned on and someone purchases a perk, these little buggers will start appearing every four rounds. They fan out and go after the perk machines for anything you've purchased. Successfully fend them off and you get to keep your perk(s). Fend them off without letting them lay a single, filthy paw on the machines and the last monkey you kill in the round will drop a bonus perk in addition to the usual Max Ammo.
How you play it is largely dependent on how many players you've got in the game. One person can capably keep the monkeys at bay, though two are better. Avoid using claymores; they're not damaging enough in the higher rounds and the smoke they throw up when they explode can obscure your vision long enough for a monkey to get past you and jump on the machine. The Ray Gun is your friend; one-hit-kills on those damn, dirty chimps.
The Gersch Device
I don't know who this Gersch guy is -- a little help from hardcore "CoD" fanfolk? -- but he's a freaking genius. The Gersch Device, also known as the Black Hole Bomb, is a new weapon in the vein of the previous maps' monkey bombs. Only this thing is far more powerful. It keeps the zombies at bay for a shorter amount of time -- still long enough to grab a pick-up or revive a comrade though -- but it's guaranteed re-death for any of horde that gets caught in its grip.
Plant the Landers
Once the power is on you'll be able to access the map's landers. There are four locations in all, including the starting centrifuge room. Hop on the lander at each location and ride it back to the starting point, preferably at the end of a round when you've got a couple of crawlers roaming around, and then hoof it up to the top floor of the map's main building (where you find the power switch/first mystery box). From there you can hit a button to launch the nearby rocket. Doing so opens up the Pack-A-Punch room, which never closes once opened until a new game is started.
Bring Some Friends
A few important things you should know about "Ascension." The map is HUGE and there are a LOT of doors to open. That, coupled with the fact that large, open spaces for you to circle and build up a horde in are few, means that this is perhaps the most solo play-unfriendly of the three currently available zombie maps. The best location to run circles in that I've found so far is close to the Stamin-Up machine and the claymores. There's also a lander pad in the area, one of the three situated outside the starting room.
Beyond all that, standard rules apply. Go for a Ray Gun and a point-earning beast, hold off on upgrading for as long as you can -- remember, that 5000 points also gets you a free Max Ammo for the gun -- and tread carefully. Jugger-Nog should be considered an essential perk, the one you'll definitely want to defend when the monkeys come.
